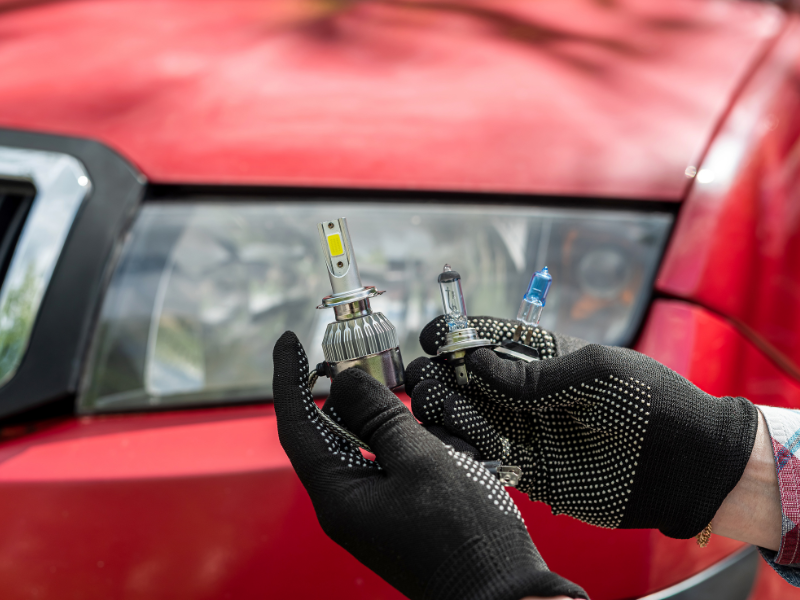
LED headlights are becoming increasingly popular due to their better performance compared to traditional halogen bulbs. They offer increased visibility and a longer lifespan. That being noted, many vehicle owners opt to handle the uninstallation of LED headlights themselves, which isn't particularly challenging.
However, keep in mind that there are additional steps and factors to bear in mind as you proceed with installing LED headlights in your car.
Don’t worry. You don’t need to look anywhere else. In this article, we have discussed how to choose the right LED headlights for your vehicle and how to install them properly.
So let’s get started…
How do you select the right LED headlights for your vehicle?
Choosing the appropriate LED headlights for your vehicle is crucial for ensuring optimal visibility and safety while driving. With advancements in automotive lighting technology, LED headlights offer superior brightness, energy efficiency, and longevity compared to traditional halogen bulbs.
However, it's essential to select the right bulb size to fully reap the benefits of LED headlights.
Let's explore why bulb size matters and how you can easily find the correct size for your vehicle.
1. Importance of Bulb Size:
Using the correct bulb size is essential for several reasons:
- Beam Pattern: Different vehicles are designed with specific headlight assemblies, including reflectors and projectors, to produce a particular beam pattern. Using the correct bulb size ensures that the light emitted from the LED headlights is properly focused and distributed, maintaining the intended beam pattern for optimal visibility.
- Fitment: Bulb size corresponds to the physical dimensions of the LED headlight, including its base and overall shape. Using the wrong bulb size may result in poor fitment within the headlight housing, leading to potential issues such as improper sealing, water ingress, or difficulty in installation.
- Electrical Compatibility: Bulb size also dictates the electrical specifications of the LED headlight, such as voltage and wattage. Using an incorrect bulb size could overload the vehicle's electrical system or cause compatibility issues with the headlight housing.
2. Finding Your Bulb Size:
There are two primary methods to determine the correct bulb size for your vehicle:
i. Using a Bulb Size Finder Tool:
Many online retailers offer bulb size finder tools on their websites. These tools typically require you to input your vehicle's make, model, year, and sometimes specific trim or package options. The tool then generates a list of compatible bulb sizes for your vehicle's headlights, including LED options.
You can discover the right LED headlight size effortlessly with Carifex!
Simply navigate to our LED Headlight section, where we have listed all our LED headlights-related products. Explore our listings, and you'll find an integrated tool to find compatible LED headlights for your vehicle.
Inside the listing,
- Simply fill in the boxes Year, Make, Model.
- Then voila, you are good to go.
With Carifex, achieving optimal illumination has never been simpler.
ii. Checking Your Vehicle's Owner's Manual:
Your vehicle's owner's manual is an invaluable resource for maintenance and specifications, including information on replacement bulbs.
Refer to the "Vehicle Maintenance" or "Replacement Bulbs" section of the manual, which should provide details about the appropriate bulb sizes for your vehicle's headlights. This method is especially useful if you prefer to have the manufacturer's recommended specifications.
For your information
Standard forward-facing vehicle illumination typically falls into three categories:
- High beams,
- Low beams,
- Fog lights.
High and low beams can sometimes be integrated into a single bulb, while in other cases, vehicles feature distinct bulbs for high and low beams.
Consequently, you might find yourself needing to acquire two or three headlight replacement kits to complete your project.
Another aspect to consider is whether your LED headlights require a decoder. This becomes particularly relevant for vehicles manufactured post-2000, as many manufacturers adopted a centralized communication system(often called a CANBus System) to manage all electrical functions within the vehicle.
3. Additional Features to Consider When Choosing LED Headlights
When choosing LED headlights, there are several additional features beyond bulb size that you should consider to ensure optimal performance and compatibility with your vehicle:
i. Color Temperature:
LED headlights come in various color temperatures, measured in Kelvin (K). The color temperature affects the appearance of the light emitted, ranging from warm yellowish hues to cooler bluish tones.
Common options include 3000K (warm white), 5000K (neutral white), and 6000K-6500K (cool white). Choose a color temperature that suits your preference and provides good visibility without causing glare for other drivers.
ii. Brightness (Lumens):
Lumens measure the total amount of visible light emitted by the LED headlights. Higher lumens generally indicate brighter headlights, but it's essential to strike a balance between brightness and glare. Consider the specific lighting requirements for your driving conditions and ensure compliance with local regulations regarding headlight brightness.
iii. Beam Pattern:
In addition to bulb size, the beam pattern plays a crucial role in the effective distribution of light on the road. Look for LED headlights with a well-defined beam pattern that provides sufficient illumination without causing glare or uneven lighting. Some headlights feature adjustable beam patterns to accommodate different driving environments.
iv. Heat Dissipation:
LED headlights generate heat during operation, and efficient heat dissipation is essential to maintain performance and prolong the lifespan of the bulbs. Opt for headlights with effective heat sink designs or built-in cooling systems to prevent overheating and ensure consistent performance over time.
v. Durability and Reliability:
Choose LED headlights from reputable manufacturers known for their quality and reliability. Look for headlights with durable construction, waterproof ratings (IPX4 or higher recommended), and robust sealing to withstand various weather conditions and environmental factors.
vi. Energy Efficiency:
LED headlights are more energy-efficient than traditional halogen bulbs, but the efficiency can vary depending on the design and technology used. Select headlights with high energy efficiency to minimize power consumption and reduce the load on your vehicle's electrical system.
vii. Compatibility with Vehicle Electronics:
Ensure that the LED headlights are compatible with your vehicle's electronic systems, including the CAN bus (Controller Area Network) for modern vehicles with advanced lighting control features. Some LED headlights come with built-in CAN bus compatibility to prevent flickering or error messages on the dashboard.
viii. Warranty and Customer Support:
Check the warranty coverage and available customer support options offered by the manufacturer or seller. A reliable warranty provides peace of mind and protection against potential defects or issues with the LED headlights.
By considering these additional features alongside bulb size, you can make an informed decision and choose LED headlights that meet your specific requirements for performance, durability, and compatibility with your vehicle.
DIY: What are the tools I need to have if I want to install the LED headlights in my vehicle by myself?
You'll need a set of tools to facilitate the installation process of LED headlights on your vehicle as a DIY project.
Here's a list of essential tools you might require:
- Screwdriver Set: A variety of screwdrivers, including Phillips and flathead types, will likely be needed to remove screws or fasteners securing the headlight assemblies.
- Socket Wrench Set: Different socket sizes may be necessary to loosen and remove bolts or nuts holding the headlight assemblies in place.
- Pliers: Standard pliers can be useful for tasks such as gripping and turning small nuts or bolts or for securing wiring connections.
- Wire Cutters/Wire Strippers: These tools are essential for cutting and stripping insulation from wires, allowing you to properly connect the wiring harnesses for the LED headlights.
- Trim Removal Tool: Depending on your vehicle's design, you may need a trim removal tool to gently pry off plastic trim pieces or panels to access the headlight assemblies.
- Torque Wrench (optional): If your vehicle's manufacturer specifies torque settings for headlight assembly bolts, a torque wrench will ensure you tighten them to the correct specifications without over-tightening.
- Flashlight or Work Light: Adequate lighting is essential when working on your vehicle, especially in tight or dark areas. A flashlight or work light will help you see clearly during the installation process.
- Safety Gear: Wear protective gear such as gloves and safety glasses to prevent injuries while handling tools and working with electrical components.
- Multimeter (optional): A multimeter can be useful for checking electrical connections and verifying voltage, resistance, or continuity during the installation process.
- Trim Clip Removal Tool (optional): If your vehicle uses trim clips to secure plastic panels or trim pieces, a trim clip removal tool can make it easier to remove them without damaging the clips or surrounding surfaces.
- Allen Keys/Hex Keys (if applicable): Some vehicles may require Allen keys or hex keys to loosen or tighten specific fasteners on the headlight assemblies.
- Vehicle Owner's Manual: Refer to your vehicle's owner's manual for specific instructions and diagrams related to accessing and removing the headlight assemblies.
Having these tools on hand will help you complete the LED headlight installation process efficiently and effectively, ensuring proper fitment and functionality for your vehicle's lighting system.
How to Install LED Headlight Replacements?
Installing LED headlight bulbs can vary slightly depending on the make and model of your vehicle.
Before starting the installation process, it's important to ensure your safety by disconnecting the negative battery terminal. This prevents any accidental electrical discharge and reduces the risk of electric shock. Locate the negative terminal (usually marked with a minus sign "-") on your car's battery and use a wrench to loosen the nut.
After loosening, carefully lift the negative terminal away from the battery and secure it in a position where it won't accidentally make contact.
Once you have done that, here are general steps you can follow to install the new LED Headlight bulb:
1. Gather Materials:
Make sure you have the correct LED headlight bulbs for your vehicle. Most LED headlight kits come with bulbs, adapters, and sometimes additional wiring.
2. Prepare your Vehicle:
Turn off your vehicle's engine and allow it to cool down. Ensure the headlights are turned off, and the keys are removed from the ignition.
3. Access the Headlight Housing:
Depending on your vehicle, you may need to open the hood or access the headlight housing from behind the front bumper. Pop the hood of your car and locate the backside of the headlight assembly. This may involve removing any covers or panels that obstruct access.
Some vehicles have screws or clips securing the assembly in place, so you may need to remove these as well. Additionally, you can refer to your vehicle's manual for specific instructions on how to access the headlights.
4. Remove the Old Bulb:
Carefully detach the wiring harness from the back of the old headlight bulb. This may require twisting or pulling, depending on the design of your vehicle. Then, remove the old bulb from the headlight housing by twisting it counterclockwise or pulling it out gently, depending on the type of bulb.
When you are carefully removing the old bulb from the socket, make sure to take note of its orientation for later reference.
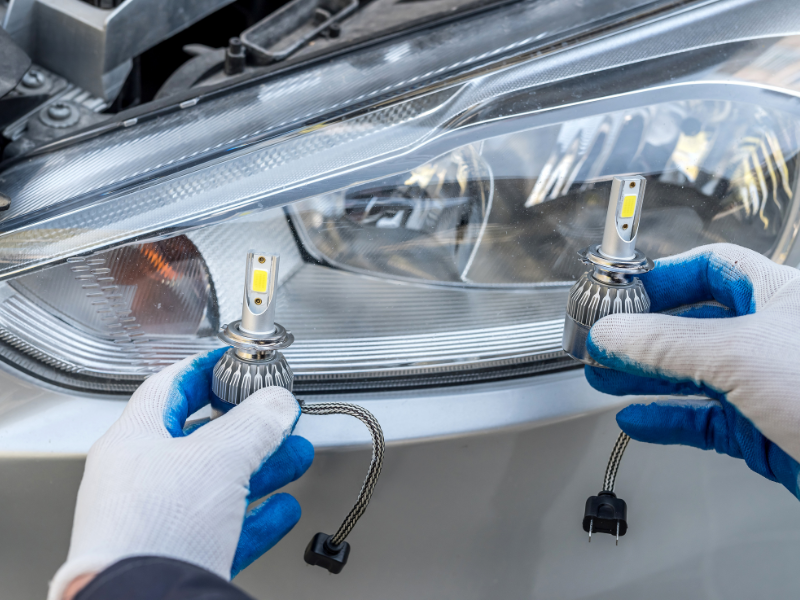
5. Install the LED Bulb:
You need to make sure that the LED bulb you going to replace is compatible with your vehicle's make and model before inserting the new one. Then insert the LED bulb into the headlight housing. Make sure it's properly aligned and seated securely. Some LED bulbs have tabs or notches to ensure correct alignment.
In the meantime, keep in mind to pay attention to the heat sink placement, ensuring it has enough space to dissipate heat effectively.
6. Connect the Wiring:
Attach the wiring harness of the LED bulb to the corresponding connector in your vehicle's headlight housing. Ensure a secure connection to prevent flickering or malfunctioning.
7. Test the LED Bulb:
Before reassembling everything, turn on your vehicle's headlights to test the new LED bulb. Ensure that both low and high beams are working correctly.
8. Adjust the Beam:
If necessary, adjust the aim of the headlights to ensure proper alignment and avoid blinding oncoming drivers. Refer to your vehicle's manual for instructions on how to adjust the headlight aim.
9. Secure and Reassemble:
Once you've confirmed that the LED bulb is working properly and the aim is adjusted correctly. Then secure any retaining clips or covers and reassemble any parts you removed to access the headlight housing. Double-check that everything is properly aligned before proceeding.
10. Repeat for the Other Headlight:
If you're replacing both headlights, repeat the same process for the other side of your vehicle.
11. Reconnecting the negative battery terminal:
Now that the installation is complete, it's time to reconnect the negative battery terminal. Slide the terminal back onto the battery post and tighten the nut securely with a wrench.
12. Testing the new headlights:
Before closing the hood, turn on the headlights and check for proper function. Test both low and high beams to ensure they are working correctly. If everything looks good, close the hood and you're all set to hit the road with your new LED headlights.
13. Dispose of Old Bulbs:
Properly dispose of the old halogen or HID bulbs according to your local regulations. Many auto parts stores accept old bulbs for recycling.
14. Check Regularly:
After installation, periodically check your LED headlights to ensure they're functioning correctly and haven't come loose.
Always refer to your vehicle's manual and follow any specific instructions provided by the manufacturer of your LED headlight bulbs for the best results. If you're unsure about any step, it's recommended to consult a professional mechanic or technician.
How Long Does it Take to Install LED Headlights?
The time it takes to install LED headlights can vary depending on factors such as your experience with car maintenance, the specific make and model of your vehicle, and any unforeseen complications that may arise during the installation process.
On average, installing LED headlights typically takes between 30 minutes to 1 hour for each headlight assembly. This estimate includes the time needed to access the headlight assembly, remove the old bulb, position the new LED bulb, reconnect the electrical connector, reinstall the headlight assembly, and reconnect the negative battery terminal.
However, some installations may be quicker if you're familiar with your vehicle's design and the process involved. Conversely, it could take longer if you encounter any difficulties or if additional adjustments are needed to ensure proper fitment and alignment.
To streamline the installation process, it's helpful to have the necessary tools and equipment readily available, follow the manufacturer's instructions carefully, and take your time to ensure everything is done correctly and safely.
Factors that can affect installation time include:
- Access to Headlight Housings: Some vehicles have headlight housings that are easier to access than others. If your vehicle requires removing additional components or panels to reach the headlights, it may take longer.
- Wiring Complexity: LED headlight kits often come with wiring adapters or harnesses that need to be properly connected. If your vehicle's wiring setup is more complex or requires additional modifications, it can add to the installation time.
- Alignment and Adjustment: Ensuring that the LED headlights are properly aligned and aimed is crucial for optimal performance and safety. Adjusting the headlight aim may take some time, especially if you're meticulous about getting it just right.
- Experience Level: If you're familiar with working on cars and have installed headlights before, you may be able to complete the task more efficiently. However, if you're new to automotive DIY projects, you might need more time to familiarize yourself with the process.
Which is better, Should I install LED headlights bulbs myself or via a technician?
It depends on your comfort level with car maintenance and the complexity of your vehicle's headlight assembly.
Here are some factors to consider:
- Skill Level: If you're experienced with car maintenance and comfortable working with electrical components, installing LED headlight bulbs yourself may be feasible. However, if you're not confident in your abilities or lack experience, it's safer to have a technician handle the installation.
- Time and Convenience: DIY installation can save time and money, but it requires dedicating time to the task. If you're short on time or prefer convenience, having a technician perform the installation may be a better option.
- Warranty Considerations: Some LED headlight bulbs come with warranties that may require professional installation to remain valid. Be sure to check the warranty terms before deciding.
- Complexity of Installation: The difficulty of installation varies depending on your vehicle's make and model. If the installation process seems complex or requires special tools, consulting a technician can ensure proper installation and functionality.
Ultimately, weigh these factors and choose the option that best suits your skill level, time constraints, and warranty considerations. If unsure, consulting a technician for professional assistance is advisable.
Troubleshooting Common Installation Issues
Starting to use LED headlights may cause some problems, like flickering lights or strange beam patterns. These issues usually happen because the connections aren't quite right or you might need extra parts.
Here's how to smooth out the ride:
- Secure All Connections: A loose connection can be like a missed handshake—awkward and ineffective. Double-check to ensure every connector clicks home.
- Decoders and Resistors: Sometimes, your vehicle's electrical system speaks a different language than your new LEDs. Decoders or resistors can act as translators, ensuring both parties understand each other perfectly.
Think of these steps as fine-tuning your instrument to play the symphony of light exactly as you envisioned.
Maintenance and Care for Your LED Headlights
Like any piece of sophisticated technology, LED headlights thrive with a bit of TLC. Here's how to keep them performing at their peak:
- Regular Inspections and Cleanings: Just as you would care for a prized possession, regular check-ups and cleanings help maintain the brilliance of your LED headlights.
- Check the Alignment: Proper alignment is key to ensuring your LEDs illuminate the road ahead without blinding fellow travelers.
- Adapt to Weather Conditions: Extreme weather can test the mettle of even the hardiest LEDs. Be observant and ready to adjust your driving and maintenance routines to keep your path illuminated under all skies.
Innovative cooling technologies like advanced heat sinks and fans are the secret heroes behind the scenes, safeguarding your LEDs from the nemesis of overheating and ensuring they continue to shine brightly and faithfully.
Final Thoughts
As LED headlights continue to gain popularity for their superior performance and longevity compared to traditional halogen bulbs, many vehicle owners are opting to install them themselves. While the process isn't particularly challenging, there are essential steps and factors to consider to ensure a successful installation.
For this to work without trouble, choosing the right LED headlights for your vehicle is crucial for optimal visibility and safety while driving.
Yes, advancements in automotive lighting technology offer superior brightness, energy efficiency, and longevity, but selecting the correct bulb size is essential to reap these benefits fully. You can easily determine the right bulb size using online tools provided by retailers or by consulting your vehicle's owner's manual.
When installing LED headlights, it's essential to have the necessary tools and equipment on hand, follow manufacturer instructions carefully, and prioritize safety by disconnecting the negative battery terminal before beginning the installation process.
On average, installing LED headlights typically takes between 30 minutes to 1 hour for each headlight assembly, depending on factors such as experience level and vehicle complexity.
While DIY installation can save time and money, it's essential to consider factors such as skill level, time constraints, and warranty considerations. Consulting a technician for professional assistance may be advisable if you're unsure about the installation process or encounter any difficulties.
Additionally, troubleshooting common installation issues such as flickering lights or beam pattern irregularities may require securing connections or using decoders/resistors to ensure compatibility with your vehicle's electrical system.
Regular maintenance and care for your LED headlights, including inspections, cleanings, and proper alignment adjustments, will help maintain their performance and longevity over time. Innovative cooling technologies play a vital role in safeguarding LEDs from overheating, ensuring they continue to shine brightly and reliably under various weather conditions.
By following these guidelines and considering important factors, you can successfully install LED headlights in your vehicle and enjoy improved visibility and safety on the road for years to come.
Happy upgrading, and may your travels always be bright.
Key Points
- LED headlights offer superior performance and longevity compared to traditional halogen bulbs, making them increasingly popular among vehicle owners.
- Proper selection of LED headlights is crucial for optimal visibility and safety while driving, considering factors such as bulb size, brightness, beam pattern, and compatibility with your vehicle's electrical system.
- Bulb size matters for ensuring the correct beam pattern, fitment within the headlight housing, and compatibility with your vehicle's electrical specifications.
- Methods for determining the correct bulb size include using online bulb size finder tools provided by retailers or consulting your vehicle's owner's manual for manufacturer recommendations.
- LED headlights come with additional features to consider, such as color temperature, brightness (lumens), beam pattern, heat dissipation, durability, energy efficiency, compatibility with vehicle electronics, and warranty coverage.
- DIY installation of LED headlights is feasible for those with experience in car maintenance, but it's essential to have the necessary tools, follow manufacturer instructions carefully, and prioritize safety by disconnecting the negative battery terminal before beginning the installation process.
- Professional installation by a technician may be advisable for those who are unsure about the installation process or encounter difficulties, especially considering warranty considerations and complex vehicle designs.
- Troubleshooting common installation issues such as flickering lights or irregular beam patterns may require securing connections or using decoders/resistors to ensure compatibility with your vehicle's electrical system.
- Regular maintenance and care for LED headlights, including inspections, cleanings, and proper alignment adjustments, are essential for maintaining performance and longevity over time.
- Innovative cooling technologies play a vital role in safeguarding LED headlights from overheating, ensuring they continue to provide reliable illumination under various weather conditions.
FAQs
Can I install LED headlights myself?
Yes, you can install LED headlights by yourself or with the help of a professional mechanic or an automotive-inclined friend. The process might take a few hours based on the complexity of your vehicle's headlight assembly and your familiarity with the process. DIY installations can be a rewarding project, enhancing your vehicle’s functionality and appearance.
How do I convert regular headlights to LED?
Converting regular headlights to LED involves several steps:
- Determine Your Bulb Size: Identify the correct size for your vehicle to ensure compatibility.
- Purchase a Suitable Conversion Kit: Conversion kits typically include everything needed for the upgrade.
- Remove Halogen Bulbs: Carefully remove the existing bulbs from the headlight housing.
- Connect the LED Ballast: If required by your LED kit, connect the ballast for proper power management.
- Install the New LED Headlights: Insert the LED bulbs into the headlight housing, ensuring they are securely in place.
- Adjust Headlight Position: Use a garage door or wall to properly aim and adjust the headlights for optimal coverage and to avoid blinding other drivers.
Can I replace my halogen headlight bulbs with LED?
Yes, many vehicles allow for the direct replacement of halogen headlight bulbs with LED bulbs. LED headlights are designed to match the light-emitting position of halogen bulbs, ensuring a safe and compatible light pattern. The straightforward installation process allows most car users to perform the upgrade themselves.
Are headlights easy to install?
The ease of installing headlights varies significantly from one vehicle to another. While some headlight bulbs can be changed in just a few minutes, others may require more time, potentially up to an hour. It is highly recommended to research your specific vehicle model beforehand to get an idea of the installation process's complexity and time requirements.
Is there a wrong way to install LED headlights?
If the bulb is installed vertically rather than horizontally, the light will not properly illuminate all the reflectors. Instead, it will shine onto the chrome surfaces inside, resulting in an inadequate beam pattern. This emphasizes the importance of proper installation.